


Our dinghy specialist Jeff Smith goes through the basics of boat maintenance
Boat and engine maintenance are a vital part of owning a boat. Maintaining the engine in good working order, regularly checking the batteries and the bilge pumps (if they are fitted) are essential activities. For larger, moored boats, hauling out annually cleaning the hull of fouling and applying antifoul coatings is recommended. For inboard engines, regular checking and, if necessary, adjustment of the prop shaft seal is vital to prevent ingress of water. Some types of these seals need to be completely replaced after a number of years. The rudder shaft seal also needs to be checked.
Here are a few of the basic tasks I perform when doing a maintenance check on my boat.

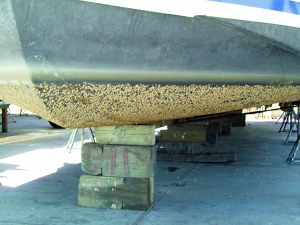
Antifouling the boat
Re-coating the anti-foul paint is certainly not a pleasant task, even on a small boat like the Warrior 175 but I've found that if I pressure wash the hull every time I take her out for trailering duties, which is usually during periods of high weed growth, then the anti-foul remains effective for two full seasons. When it does need re-coating, the task can be carried out with the boat sitting on her trailer and, by carefully blocking up, or connecting to a tow vehicle, the hull can be safely moved along the trailer with the winch-strap attached, to allow the areas where the rollers touch the hull to be 'filled in'.
Following a pressure wash, the existing surface is keyed with a medium-grit glass paper which requires the use of a face-mask and eye-protection, the water-line is masked up and two coats of paint applied, using a four-inch gloss roller and small paint brush for the 'fiddly' bits. Drying times vary between products but I find that I can usually get both coats done in a day, keeping the second day free for engine servicing and a cut and polish of the hull above the water line, and the topsides.
Servicing the Engine
A useful feature of my Suzuki engine is that it tells you when it needs a scheduled oil-change service. Every time you start the engine, the tachometer indicates how many hours the engine has run and, when a service is due, the oil pressure warning light flashes intermittently and a buzzer sounds. It's worth reading the engine handbook thoroughly to prevent these little 'frights' happening whilst you’re at sea. If the engine hours have not been achieved, then the handbook recommends that servicing be carried out on an annual basis.
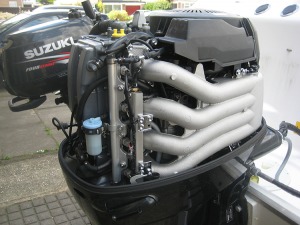
I’ve always serviced my own road vehicles, I have the tools, and feel competent enough to do so however, if you don't possess the necessary skills and equipment, boat engine servicing should be left to a professional marine engineer for obvious reasons. Outboard motors are very simple machines indeed and my Suzuki is no different to most. Basically, a four-cylinder, twin overhead camshaft, fuel injected 2 litre car engines. It sits vertically, and is attached directly to a rudimentary gearbox (the outboard leg). The engine output shaft drives a water pump, sited just above the 'gearbox', which pumps sea water directly around the engine block to facilitate cooling. The operator's handbook details the maintenance schedule, along with some guidance as to the location of components however, I always create my own written 'check list' of tasks to be carried out.
A typical 'full’ service includes a series of inspections, and the changing of spark plugs, engine oil and filter, fuel filter, gearbox oil and lubrication. I use genuine Suzuki or, OEM specified, parts and oils throughout and, despite being extremely cautious and thorough, the whole service usually takes me only about a morning in total, including stopping for tea breaks and lengthy chats to other marina dwellers, and saves me a considerable amount of money in labour costs.
Changing the oil
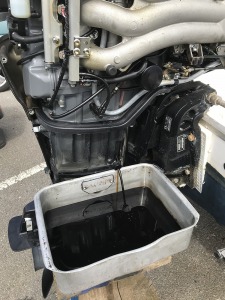
A basic tool kit, including a socket-set will suffice but you'll also need an oil-filter strap wrench, torque wrench, a good quality grease gun and a bespoke hand-pump for the gear box oil. Warm the engine thoroughly before draining the engine oil (cooling muffs, hose line attached and water supply switched on of course). This thins the oil and ensures all the dirty stuff gets drained out. You can see how black it is in the picture.
Make sure you have a big enough drain tray, and some means of transporting the waste oil to a disposal facility - there are 5.5 litres of it in the 100hp Suzuki. Smear fresh engine oil on the new oil filter seal and thoroughly clean the filter mount before refitting, tightening firmly by hand. I always replace the drain plug washer as a matter of course and tighten it to the correct torque as specified in the handbook. Refill with the specified quantity of oil then run the engine, to allow the oil to circulate through the filter, recheck the level and adjust accordingly as per the handbook. Be very careful NOT to over fill.
Servicing the gearbox
The gearbox oil can be drained into the same container but it's important to use the correct size screwdriver (usually flat bladed) to undo the drain/refill plugs so as not to cause damage. I always keep a spare plug in my parts stock. With the engine in the vertical position, new gearbox oil should be pumped into the lower drain hole until it seeps from the upper-level hole, then the lower plug fitted. This can take a bit of practice to do without spilling too much oil so it’s a good idea to have plenty of rags on the floor underneath the engine, and a quantity of oil in reserve. The Suzuki needs 1.1 litres, so I usually buy 2 litres to be on the safe side and the remainder can be used on the next service.
New plugs
Again, new plug washers are used, and care taken when tightening the screw plugs. Spark plugs are so cheap that I tend to replace mine on every service regardless and checking their colour/condition is a good indication of how the engine is running. The specified plug gap should be checked (even with new plugs) using a feeler gauge, and extreme care should be taken when fitting to avoid cross threading the soft alloy cylinder head material, and the specific tightening torque must be adhered to.
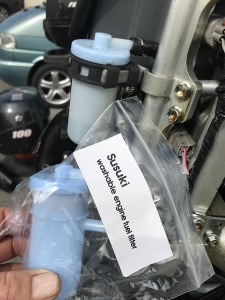
Fuel filter
I also replace the fuel filter on every service and thoroughly inspect the fuel lines for degradation all the way back to the fuel tank connection, including the fuel bulb, replacing with new if necessary including any corroded hose clips. My original fuel line system was replaced after five years of use, purely as a precautionary measure.
Inspect the anodes
The engine is fitted with several sacrificial anodes and connecting wires, both internal and external, which should be inspected on every service. I always keep a complete spare set but have found that by flushing with fresh water after EVERY trip, the internal anodes have only required replacing once in 700 hours of use and, similarly, the external block anode has only needed to be replaced on one occasion. Again, the handbook shows their location and guidance on wear limitations.
Thermostat
My Suzuki has a thermostat that controls the flow of the cooling water and this is removed and inspected at each service interval, and the housing gasket replaced. When cool, it should be closed, and open when tested in a cup of hot water from a kettle. Visually, it should be reasonably clean and free from calcium deposits which will Inhibit its functioning but, if in doubt, replace with new.
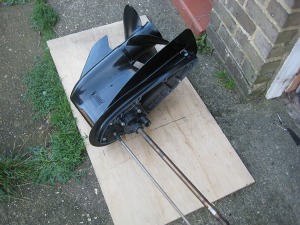
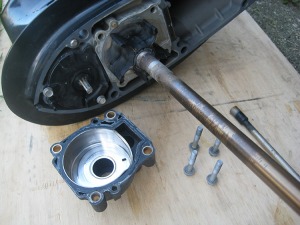
The Impeller
The water pump impeller is inspected by removing the lower part of the leg which is held in place on the Suzuki by six bolts. Ensure that the position of the trim tab is marked with a paint pen or similar before removing its bolt, otherwise the boat will go around in circles and confuse you.
The leg is heavy and unwieldy so be careful when removing it and place it on something protective (I used a sheet of plywood). The impeller housing has four bolts and it’s worth checking the internal faces of the pump housing for wear and replacing if necessary. Care should be taken at this point to ensure that no parts are lost or refitted in the wrong order - taking photos is a wise move.
Get a new gasket for the pump housing as it's very delicate and can easily be damaged when dismantling but ensure that all the old gasket material is carefully cleaned off the housing, without damaging the soft alloy surfaces, before reassembly.
The Impeller should be closely inspected for cracks, or damaged blades and replaced with new if in any doubt about its condition - again, regular flushing with fresh water helps protect these components.
When refitting the impeller and housing, apply a thin coat of marine grease to the surfaces and gently rotate the drive shaft in the correct direction to aid assembly. It also worth greasing the drive shaft and gear shifter splines at this time.
Refitting with assistance
It's useful to employ the services of an able assistant to help when refitting the leg as the drive and gear shifter splines often need a bit of 'fiddling' to re-align. Ensure NOT to force anything and that all mating surfaces are closed before fully tightening the bolts to the specified torque settings and finish by checking the rotation of the propeller and the gear shifter operation. The propeller should be removed, so that the shaft splines can be greased and a new split pin used on reassembly, along with the correct torque setting for the retaining nut. If there is any serious damage to the propeller, it should be attended to by a specialist to ensure that it is balanced correctly and doesn't damage the transmission however, minor 'nicks' of a few mm can be carefully 'dressed' with a metal file. If in any doubt, ask a marine engineer to inspect it and advise.

Grease points
The Suzuki has several grease points (detailed in the handbook) which will need topping up from a grease gun and areas on the steering mechanism which will need lubricating. I tend to clean old, dirty grease off any components before applying new and use a very high-quality marine-specific product. When pumping the grease nipples, I like to see clean grease appear from the component and always wipe off the excess.
Steering and remotes
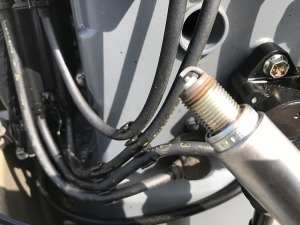
My steering system and throttle/gear selector cables have, thus far, remained trouble free but I check them for smoothness of operation, dismantling and lubricating them when necessary -usually about every third service. Exposed cables should be checked for corrosion, cleaned and greased accordingly. The trim sensor unit, which is prone to sticking on these Suzukis and often unnecessarily replaced at considerable expense, also benefits from a quick strip-down, clean and re-grease at every service interval, followed by a 'wiggle' with the ignition switch 'on' to ensure that it's working correctly. Before leaving the engine, it’s a good idea to check the tightness of all bolts and fuel/electrical connections and finally apply an anti-corrosion spray, wiping off any excess, prior to refitting the covers.
A 50/50 mix of WD40 and chainsaw oil applied from a spray bottle was recommended to me by a reputable marine engineer and it has kept my engine completely corrosion free for several years.
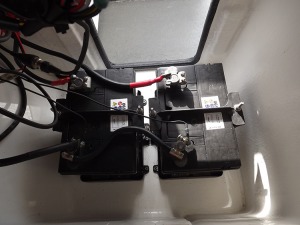
Batteries and electrics
Battery terminals should be cleaned and tightened and a thin smear of petroleum jelly applied to maintain a sound connection and, simultaneously, I tend to inspect the boat's electrical system checking for corrosion of terminals, switches and fuses and replacing/reconnecting with new where necessary. A voltmeter connected across the battery terminals with the engine running will give a good indication of the state of the engine's charging system but if the battery is suspect, then taking it to a specialist for testing is good practice. Local motor factors often have this facility, free of charge.
If your mooring has an electricity supply, or you keep the boat at home, a battery 'conditioner' is a sound investment or, failing that, regular running of the engine, will keep the battery charged, and in good condition.
Summary
If I'm satisfied that I’ve done everything on my check list, I'll connect the cooling muffs and water supply, start the engine and run it up to operating temperature ensuring there are no fluid leaks and all components and systems are working correctly, including gear selection and steering. Finally, I make a note in my handbook, or on my servicing schedule, of the work carried out along with any other notes and comments. If the servicing intervals as specified in the manufacturers handbook are followed then, usually, there shouldn't be any operational issues.
If you enjoyed this article you can buy the issue or subscribe by clicking the links below:
Buy digital copies - £2.99 each Subscribe Now Digital Subscription Click here for 12 Months of digital issues for £19.99