


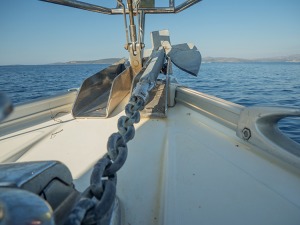
A very important piece of kit for all anglers with boats – Tim Macpherson looks at the options.
There is a wide variety of anchor type and many boat owners have their own preferences, many more just use the one that the boat comes with but are we all using the appropriate one for the task at hand.
1. Bruce (or Claw) Anchor
Trademarked as the Bruce anchor, the anchor designed to keep North Sea Rigs in their place, this one works in most conditions but I’ve found they can slip in hard mud or clay. It is a very popular one. It was developed in the 70’s and is an all-purpose grip and performs well in most substrates: mud, sand, grass, rock and even coral. Hard clay surfaces can make it difficult and the shape of the flukes makes it vulnerable to fouling in heavy grass. It often sets more easily because of its three-claw design. It has an awkward one piece design and has a low holding power per kilo. Although a relatively compact design, the only disadvantage of the bruce-style of ground anchor is that it doesn't fold flat, and therefore may be difficult to stow if you're limited for space. If that is the case, other designs such as the Danforth (fluke) might be considered as alternatives.

2. Plough Anchor
This is also called a Plow and Delta wing – which are both trademarks. These come in hinged and one piece designs. The Plow is the oldest design and is used more for deeper waters but has a low holding power. It gets its name from the plough shape witch digs in well and this anchor will reset itself if a change in pull trips it. The hinged version does make it more responsive to tide changes. Delta anchors are the standard choice for most manufacturers these days and has a holding power 50% more than the Claw or Bruce anchor. This one can struggle in rock substrate.

3. Fluke (or Danforth) Anchor
Also called the Danforth anchor – there are versions that are made from lightweight aluminum and come apart for easier storage. Flukes are good on sand and mud but struggles a bit on harder bottoms. Many boat owners use them as secondary anchors. There are many similar lightweight fluke anchors on the market, including the Fortress, which is aluminum. In a strong current, the broad flukes of the Danforth and similar fluke anchors can make them sail through the water rather than sink to the bottom.

4. Grapnel Anchor
More popular with smaller boats and kayaks. They fold compactly and are easy to stow. The holding power comes from it hooking into another object like a rock. It has immense holding power when set correctly. This has made it difficult to retrieve sometimes but using an Alderney ring will mitigate this most of the time. Because they are often made from bendable steel or iron they are used as “sacrificial” anchors for rocky marks where the angler wants to do minimal damage to the rocks or corals.

5. Kedge Anchor or “The Fishermans” anchor
We’ve used one of these on our 17” Strikeliner for years and found it perfectly adequate for all substrates. It resembles the grapnel but has a foldaway bar which makes stowage easier. It also has tremendous holding power in most tides and currents.
There are few things worth considering when choosing an anchor; think about the predominant substrate you’ll be anchoring in because as it shows above different anchors work better in different bottom geography. What conditions are you anchoring in? Are they strong tides and also how much storage space do you have to stow the anchor? How foldable is the anchor you choose?

Chain and Rope Length
The chain and rope length must be far longer than any of the depths you are fishing in. So ideally it would be 7.5m of rope for every 1m of water you will be anchoring in and 12mm diameter rope for every 9 metres of boat. You’ll need a good length of chain – some recommend 1m of chain for 1m of boat length twice the length of the boat. Attach the rope to the anchor using a shackle in between ideally your rope will have an eye and/or thimble spliced into one end to make attaching a shackle easy.
If too little rope is let out then as the tide rises you may experience some drag – which is a pain as you effectively drift away from your fishing spot and will have to re set. Ideally you want a 45% angle on the rope to set the boat and anchor properly. Also, it might be worth marking the rope at 1-metre intervals so you can work the depth effectively.
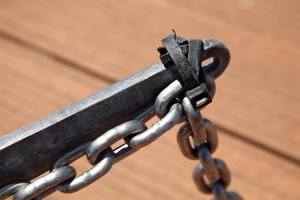
Anchor Trips
There are various ways to trip an anchor, my favoured way is the traditional method of tying the chain to the top link or shackle on the anchor using cable ties, or heavy mono. It needs to be strong enough to hold the anchor steady and just weak enough to allow the Alderney ring to do its job if the anchor becomes snagged tight into something.
Should the anchor become heavily snagged and difficult to retrieve, the cable ties will break, allowing the anchor to trip and be pulled out backwards, hopefully free of the snag. I tend to use three 5 millimetre width cable ties but it's useful to experiment with different configurations. Light twine or, at a pinch, some heavy mono-filament fishing line can be used instead of cable ties, if preferred, and again, it's really a case of trial and error to see what works best for you. If you find that the anchor is tripping too easily, just gradually increase the number of cable ties, or turns of twine/mono, until it holds effectively.
One important tip: ensure there is a little slack in the chain between the crown and eye before attaching the trip mechanism in place, as this will allow the anchor to release more effectively.
If you enjoyed this article you can buy the issue or subscribe by clicking the links below:
Buy digital copies - £2.99 each Subscribe Now Digital Subscription Click here for 12 Months of digital issues for £19.99